Microstock panel
A new tab “Microstocks” has appeared. And now you have more convenient status management tool. How does it works? Now we will tell and show.
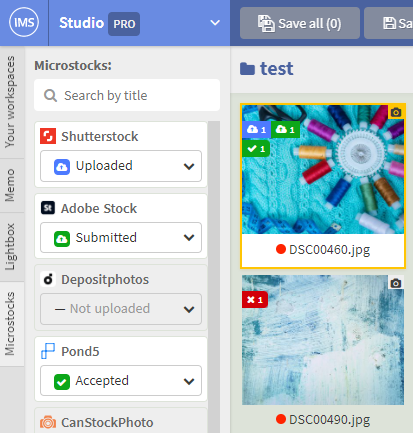
Click on the “Microstocks” panel, you will see a list of all microstocks. Warning/error icons will be displayed to the right of the microstock name if the file does not meet the requirements or it is not yet ready for upload. Moreover, you can now specify your own verification rules for each microstock in the corresponding settings section.
Under the name of the microstock there is a drop-down list, with which you can set a new status in 1 click.
You can find the desired microstock using the search bar. And, if you don’t use any of them, you can hide it in the settings in the “Microstocks” section
Let's not stop there, just go ahead)
New context menu
As the program evolved, the file context menu got bigger and bigger. It became so big that it became difficult to navigate it. Therefore, we cleaned it up a bit, grouped it by commands, so that it is clear to which object command belongs. Added 4 groups:
- File
- Metadata
- Convert to…
- Change asset type
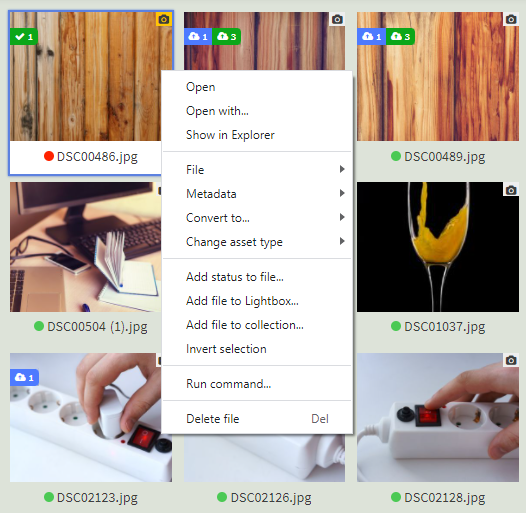
The last item is a new command that allows you to change the automatically detected file type. For example, you are working with photos and you need to save their PNG copies. Previously, such files automatically changed their type to “Illustration”, and you did not have the possibility to change this. Now you can explicitly specify that these files should be interpreted as photographs. Like other commands, you can assign a hotkey to this function through the settings)
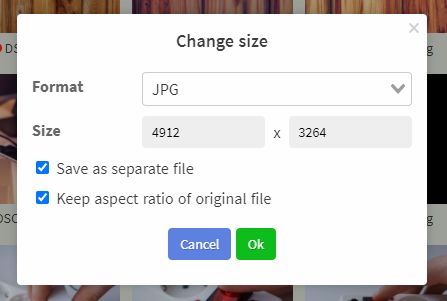
In the “Transform…” group for photos and illustrations, a new function has appeared - change size of the image. Using it, you can resave a file in JPEG or PNG format with a specified size. In the dialog you can choose either to keep the aspect ratio when scaling or not. This will also preserve the metadata of the file.
But that's not all. We have added one more item “Run command”, which will allow you to perform any action with the selected assets without digging into different menus. Clicking this button opens a dialog with a drop-down list of commands available for the selected assets. Select a command and click OK.

Improved translation
Wow! Please love and favor the most long-awaited inimitable feature - synchronous translation. Rather, read how to enable it:
- Click on the button with 2 arrows located to the right of "EN" in the metadata editor.
- The feature works with translation plugins that support the "sync-translation" feature. If you have not installed such a plugin yet, the program will offer to install it.
- Now, when you click on the button with 2 arrows, another input field will be opened. In this field you can edit the translation on the fly: enter new text and press “Enter”. This will speed up the translation and help control it)

Oh yes. Nearly forgot. The above function is suitable for working with title and description. But what about keywords? IMS Studio has prepared the display of the translation of keywords in the form of a table. Rather, take a look at it by clicking on the button to the right of “EN” above the block of keywords.
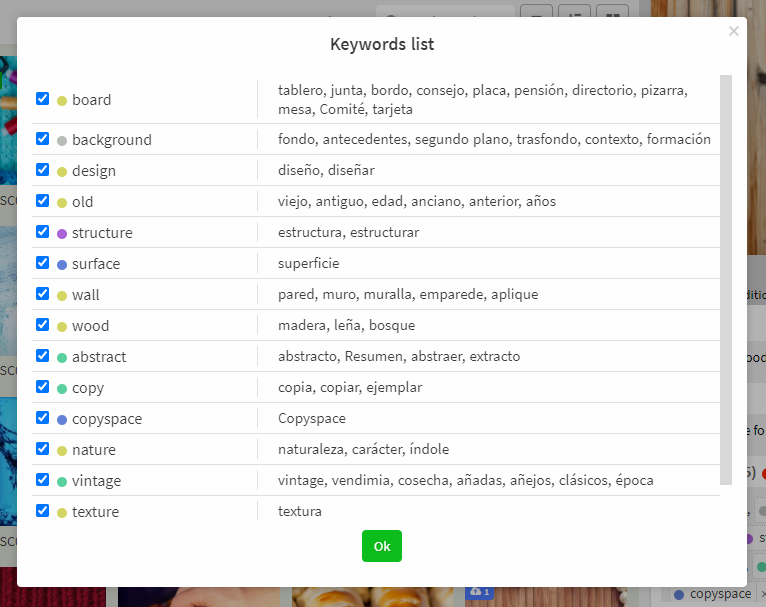
A check mark to the left of a keyword means that the keyword belongs to the selected file(s). When unchecked, the word will be removed from the list of keywords.
Improving Planning
We have the latest news. Do not miss! IMS Studio improves planning. So where would you start? Let's get to the interface. It has changed and become more comfortable for work. The sending button is now split into a scheduling button (a watch) and a send button.

In the scheduling dialog (opened by clicking on the “watch”), it became possible to spread the upload of files over several days. To select multiple dates, check the box next to this item. The selected dates will be displayed at the bottom of the dialog and as a green underline in the calendar. Ready! The program itself evenly schedules files by day.
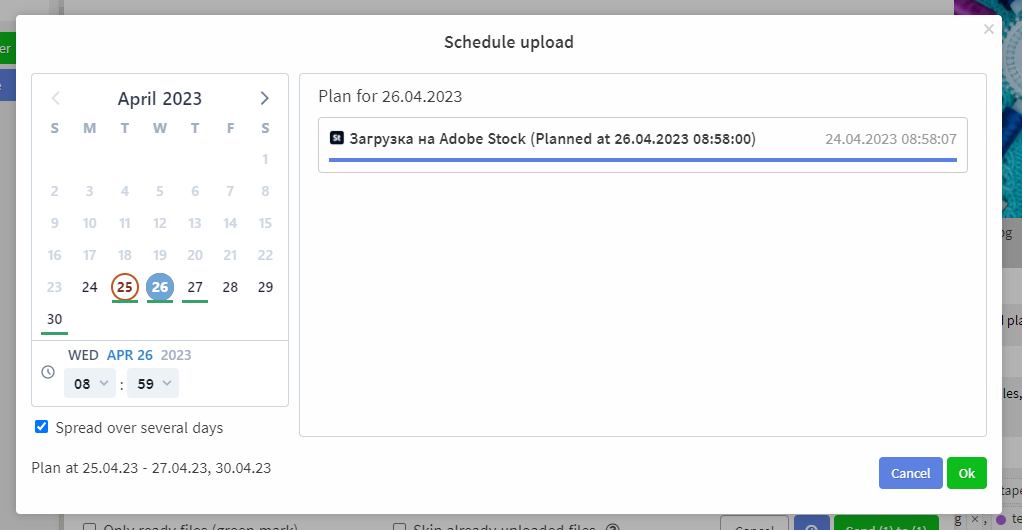
Please note that the red circles around the numbers in the calendar means that processes are already scheduled for these dates. For more information, click on a date and scheduled processes will appear in the right block.

When viewing uploads, a new panel “Scheduled processes” has appeared. When clicked, a dialog box opens with a calendar and a block for viewing processes scheduled for the day selected in the calendar. This feature will help you easily find all scheduled processes in one place. In addition, you can cancel all scheduled uploads by clicking on the red “Cancel All” button in the lower left corner of the dialog.
Connection groups
Imagine the situation, you need to send photos of birds to Pond and Shutterstock, and photos of animals to Adobe Stock and Getty (don't ask why 😀). Grouping allows you to quickly switch between selected sets of connections
Where to find it? When sending and scheduling, there is a button with an asterisk to the right of the search. Select the appropriate microstocks, click on the star and a dialog box will open for you to select the name of the new group.
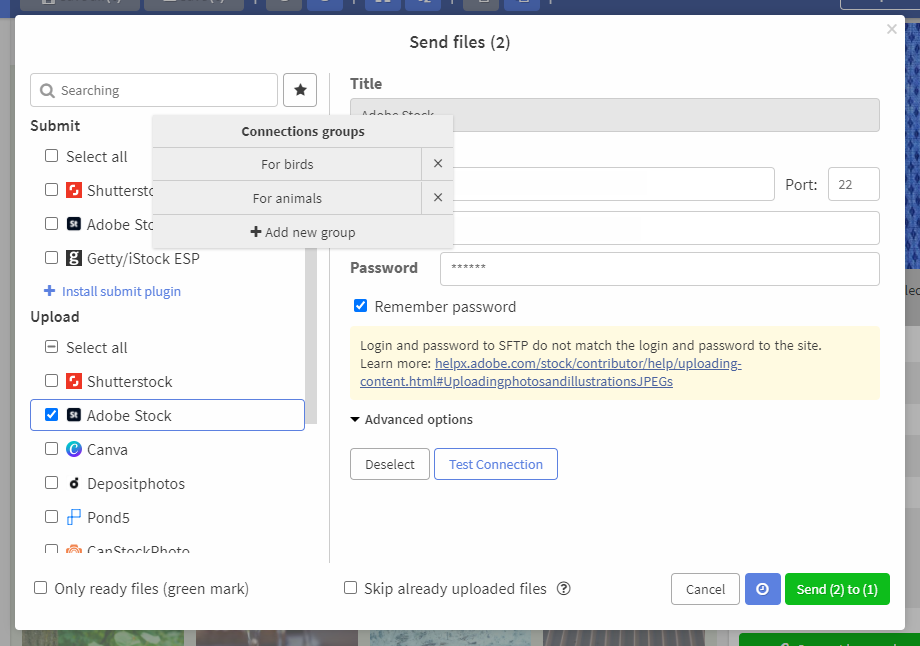
When you have several groups, they will be displayed in the drop-down list. To select a group, click on the name and all the connections of this group will be selected. To delete a group, click the cross.
You can change the content of the group. To do this, select the desired microstocks and click on the “Add or change group” item. Select the one you want to change from the drop-down list and click the "Change" button. Done)
Improving work with metadata
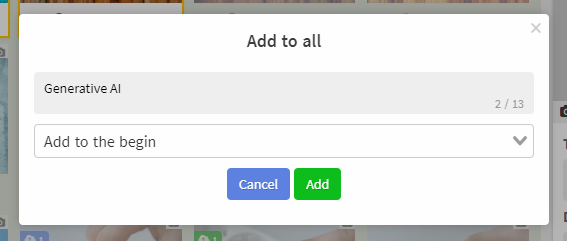
Now, when selecting multiple files with different titles and descriptions, you can add some additional text to all of them. For example, to mention that all these files are made with the help of AI. To do this, click on the button with the “+” sign. A dialog box will open where you can enter an addition to the title or description, as well as specify where to insert them.
The add keywords feature has a new superpower) Now you can specify whether or not to move keywords that match the ones you want to add. This setting is located at the bottom of the dialog, which is called after clicking on the “+” in the metadata editor with multiple selection.
Other improvements
- Fixed issue with FTP connection dropping during upload
- When entering an FTP address, extra spaces around it are now removed
- The file upload window now displays the readiness status and warnings for microstocks that have their own rules for checking metadata and warnings
- Added the feature to upload files with a name equal to the title from the metadata
- In the upload dialog microstock which are not available to upload for selected assets now written with gray color
- You can specify the upload order of the main file and preview when sending files
- Fixed default Alamy connection settings
- Fixed issue with self-signed certificates when uploading to FTP
- Added option "Save and clear form" in keyword search function
- Fixed display of automatic statuses for files that were not previously uploaded to microstocks
- Added Paste from Memo setting: whether to paste values always, including empty ones; insert only if Memo is not empty (default); insert only non-empty values:
- You can now enter multiple keywords at once (separated by comma) while adding them into stop-list
- Added the function to delete keywords presented in the stop list
- Fixed program stucking while editing of metadata
- klatin - modified condition for checking metadata “Allow only latin characters, numbers and punctuation marks”. Underscore (_) is now included in the list of allowed characters for keywords. The function works similarly to latin
- When specifying keywords for Getty/IStock/ESP, duplicate keywords are taken into account in the button title
- We have added a warning that the trial version will be ended soon
- Fixed closing of the main window when logging out of the account if there are unsaved changes.
- Added the ability to disable automatic generation of previews of EPS files on Mac
- Changed the look of keyword editing buttons if files with different values are selected
- Fixed preview display in the right panel and when it is enlarged
- Fixed output order of templates in subfolders
- Added the function to specify usage of a mirror-address on the login form
We can't believe we've made so many improvements. There is no limit to perfection, so we will constantly improve our beloved IMS Studio by releasing new and new versions. Support us by purchasing a paid subscription, write to us if something does not suit you. You can write to us in telegram chat, twitter or via feedback form. Never get upset over trifles, do what your soul lies in, and all adversity will bypass you. See you again)
P.S. Subscribe to us on telegram (https://t.me/imstocker_en)